
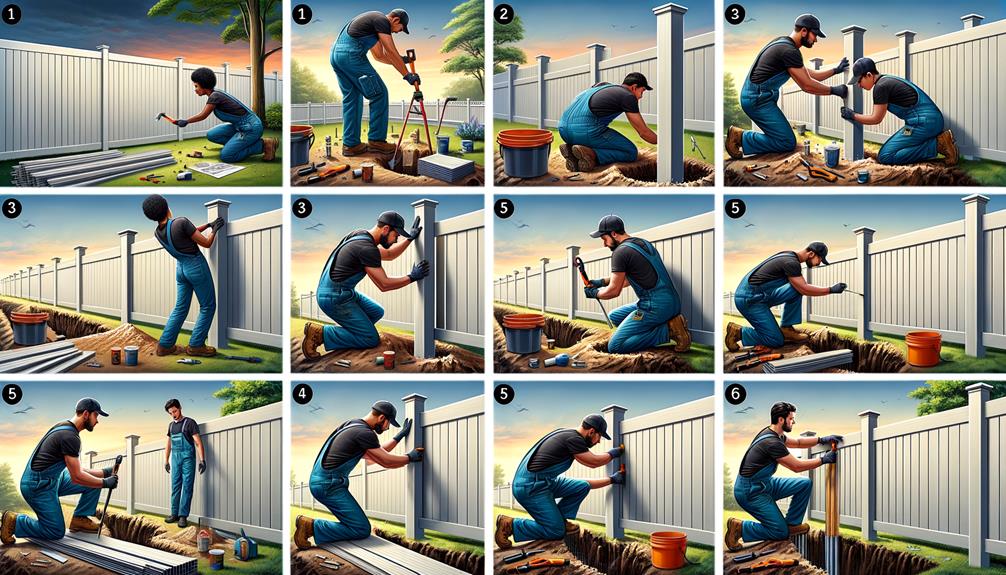
Installing vinyl fence panels may seem like a daunting task, especially if you have never done it before. However, with the right tools and materials, along with a little bit of guidance, you can easily transform your outdoor space into a secure and stylish haven. So, if you're ready to enhance your property's privacy and curb appeal, let's get started on this step-by-step journey together.
Tools and Materials Needed
To install vinyl fence panels, you will need a few essential tools and materials. Choosing the right vinyl fence panels is crucial for a successful installation. Look for panels that are made of high-quality vinyl, as they are more durable and resistant to the elements. Opt for panels with reinforced rails and pickets for added strength and stability. Additionally, consider the style and design of the panels to ensure they match your desired aesthetic.
In terms of tools, you will need a few items to facilitate the installation process. First and foremost, a post hole digger is essential for creating holes in the ground to secure the fence posts. A level will help you ensure that the fence panels are properly aligned and straight. A power drill and screws will be necessary for attaching the panels to the posts securely. Additionally, a tape measure, string, and stakes will aid in the accurate placement of the fence and maintaining consistent spacing.
Once your vinyl fence panels are installed, it is important to know how to maintain them properly. Regular cleaning is essential to prevent the build-up of dirt, grime, and mildew. Simply use a mild detergent and water solution to clean the panels, and rinse them thoroughly with a hose. Avoid using abrasive cleaners or scrub brushes, as they can damage the vinyl surface. Inspect the panels periodically for any signs of damage, such as cracks or loose screws, and make repairs as needed.
Preparing the Ground
Before installing vinyl fence panels, it is important to properly prepare the ground for a secure and stable foundation. This step is crucial to ensure the longevity and effectiveness of your fence. Here are four steps to help you prepare the ground:
- Clear the area: Remove any obstacles such as rocks, branches, or debris from the ground. This will ensure a smooth and even surface for the fence panels.
- Mark the boundaries: Use stakes and string to mark the boundaries of your fence. This will help you visualize the layout and ensure that the fence is straight and aligned.
- Preparing the soil: Level the ground by removing any high spots and filling in any low spots. Use a shovel or a rake to smooth out the surface. It is important to create a level base for the fence panels to prevent any shifting or leaning in the future.
- Compact the soil: Use a tamper or a plate compactor to compact the soil. This will help to stabilize the ground and prevent settling. Compact the soil in layers, working your way from one end to the other, until the entire area is firm and even.
Setting the Posts
To ensure a sturdy and durable vinyl fence, it is essential to properly set the posts in the ground. The first step in setting the posts is determining the digging depth. For most vinyl fences, a depth of at least 2 feet is recommended. This will provide enough stability and support for the fence.
Once you have determined the digging depth, you can start digging the holes for the posts. Use a post hole digger or a shovel to dig the holes to the required depth. Make sure the holes are wide enough to accommodate the posts and allow for some wiggle room when positioning them.
After the holes are dug, it's time to position the posts. Start by placing a post in the first hole. Use a level to ensure that the post is perfectly vertical. Adjust the position if necessary. Once the post is in the correct position, fill the hole with concrete. This will help secure the post in place and prevent it from shifting over time.
Repeat this process for each post, ensuring that each one is straight and properly positioned. Take your time to make sure that everything is aligned and level before moving on to the next post.
Setting the posts is a crucial step in installing a vinyl fence. By digging the holes to the correct depth and properly positioning the posts, you will ensure that your fence is sturdy and will last for years to come.
Installing the Fence Panels
Now that the posts are set and secured in place, you can begin the process of installing the vinyl fence panels. Follow these steps to ensure proper alignment and use leveling techniques for a professional-looking installation:
- Start by measuring the distance between the two posts where the first panel will be installed. This measurement will be crucial to ensure that the panel fits properly. Use a tape measure and take accurate measurements to avoid any gaps or unevenness.
- Place the first panel against the posts, making sure it is level both horizontally and vertically. Use a level tool to ensure that the panel is straight and adjust as necessary. This step is essential for maintaining a consistent and aesthetically pleasing fence line.
- Once the first panel is aligned and level, secure it to the posts using screws or brackets, depending on the manufacturer's instructions. Make sure to follow the recommended spacing for the screws or brackets to ensure a secure and sturdy installation.
- Repeat the process for the remaining panels, ensuring that each one is properly aligned and leveled before securing it to the posts. Take your time and double-check your work to maintain a uniform appearance and avoid any potential issues down the line.
Finishing Touches and Maintenance
After completing the installation of the vinyl fence panels, it is important to address any finishing touches and maintenance tasks to ensure the longevity and appearance of your fence. Maintaining vinyl fence panels is relatively easy and requires minimal effort. Here are some tips for enhancing the appearance of your vinyl fence panels:
- Regular Cleaning: To keep your fence looking its best, it is important to clean it regularly. You can use a mild detergent and water to remove any dirt, dust, or grime that may accumulate on the surface. Avoid using abrasive cleaners or tools that could scratch or damage the vinyl.
- Inspect for Damage: Periodically inspect your fence for any signs of damage, such as cracks, chips, or loose panels. Repair or replace any damaged parts immediately to prevent further issues and maintain the structural integrity of the fence.
- Trim Vegetation: Keep plants, shrubs, and trees trimmed away from the fence to prevent them from leaning on or growing through the panels. This will not only help to maintain the appearance of the fence but also prevent any potential damage.
- Avoid Harsh Chemicals: When cleaning your vinyl fence, avoid using harsh chemicals or solvents as they can cause discoloration or damage to the surface. Stick to mild soaps or specialized vinyl fence cleaners to ensure the longevity of your fence.
Here is a table showing the recommended maintenance tasks for vinyl fence panels:
| Maintenance Task | Frequency |
|---|---|
| Cleaning | Regularly, as needed |
| Inspection and Repairs | Annually, or as needed |
| Vegetation Trimming | Regularly, as needed |
| Avoiding Harsh Chemicals | Always |

