
Building a vinyl fence may seem like an overwhelming task, but fear not, for you are about to embark on a journey that will transform your yard into a fortress of privacy and elegance. As you prepare to delve into the world of vinyl fencing, you will discover the secrets to choosing the perfect style, preparing the ground like a seasoned pro, and flawlessly installing the fence posts and panels. But that's not all – we will also reveal the finishing touches that will elevate your fence to a whole new level. So buckle up, because we're about to embark on a fence-building adventure like no other.
Choosing the Right Vinyl Fence Style
When selecting the ideal vinyl fence style, it is crucial to consider both the aesthetic appeal and functional requirements that best suit your property. Vinyl fences come in a variety of styles, each with its own unique features and benefits. By carefully considering your needs and preferences, you can choose a vinyl fence style that not only enhances the beauty of your property but also meets your practical needs.
One of the major benefits of vinyl fencing is its low maintenance requirements. Unlike wood fences that require regular staining, painting, and sealing, vinyl fences only require occasional cleaning to keep them looking their best. Vinyl is resistant to rot, decay, and pests, making it a durable and long-lasting option for your property. Additionally, vinyl fences are not prone to fading or discoloration, so they will maintain their original appearance for years to come.
When selecting a vinyl fence style, it is important to consider the architectural style of your home and the overall aesthetic of your property. There are various options available, such as privacy fences, picket fences, and decorative fences. Privacy fences are a popular choice for homeowners who value their privacy and want to create a secure and secluded environment. Picket fences, on the other hand, are more decorative and can add charm and character to your property. Decorative fences come in a range of styles, including lattice and scalloped designs, which can enhance the visual appeal of your outdoor space.
Preparing the Ground for Fence Installation
To prepare the ground for fence installation, begin by clearing the area of any debris or vegetation that may obstruct the fence line. This is an essential step in ensuring a smooth and successful installation process. Clearing vegetation involves removing any plants, shrubs, or trees that are in the way of the fence line. This not only creates a clear path for the fence but also prevents any potential damage to the fence caused by overgrown roots or branches.
Once the area is cleared of vegetation, the next step is to level the ground. Leveling the ground is crucial to ensure that the fence is installed properly and remains sturdy over time. Uneven ground can lead to gaps or spaces under the fence, compromising its security and appearance. To level the ground, you can use a shovel or a rake to remove any high spots and fill in any low spots. It is important to pay attention to these details to ensure a level and stable fence.
Here is a table summarizing the steps involved in preparing the ground for fence installation:
| Step | Description |
|---|---|
| 1 | Clear vegetation obstructing the fence line |
| 2 | Remove plants, shrubs, and trees in the way |
| 3 | Level the ground to ensure stability |
| 4 | Use a shovel or rake to remove high spots |
| 5 | Fill in any low spots to achieve a level surface |
Taking the time to properly clear vegetation and level the ground will set the foundation for a successful fence installation. By following these steps, you can ensure that your vinyl fence will be secure, level, and visually appealing.
Installing Vinyl Fence Posts
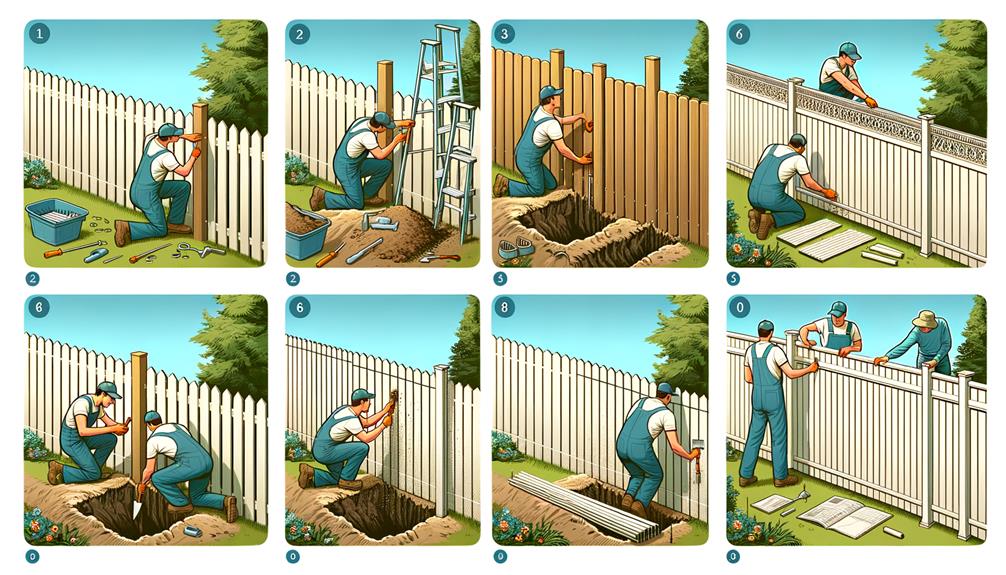
After preparing the ground for fence installation, the next step is to securely install the vinyl fence posts. Properly setting the posts is crucial for the stability and longevity of your vinyl fence. Here's a step-by-step guide on how to install the posts correctly.
First, you need to determine the spacing for your fence posts. Generally, vinyl fence panels are 6 to 8 feet wide, so you'll want to space your posts accordingly. Mark the locations for each post using stakes and string to ensure a straight line.
Dig holes for the posts using a post hole digger. The depth of the holes should be approximately one-third the height of the post, plus an extra 6 inches for the gravel base. For example, if your post is 6 feet tall, dig a hole that is 2 feet deep. This depth will provide stability and prevent the posts from leaning over time.
Before setting the posts, it's important to level them. Use a carpenter's level to ensure each post is perfectly vertical. Adjust the depth of the holes as needed to achieve the desired levelness.
Once the posts are level, mix and pour concrete into each hole. Make sure the concrete completely surrounds the posts and reaches the bottom of the hole. Use a trowel to smooth the concrete surface and remove any air pockets.
Allow the concrete to set according to the manufacturer's instructions. This usually takes around 24 to 48 hours. During this time, avoid putting any weight or pressure on the posts.
After the concrete has fully cured, you can attach the fence panels to the posts. Follow the manufacturer's instructions for this step.
Attaching Vinyl Fence Panels
To securely attach vinyl fence panels, you will need to follow a precise and straightforward process. Start by attaching the vinyl fence rails to the posts. Line up the pre-drilled holes on the rails with the corresponding holes on the posts. Insert screws through the holes and tighten them using a drill or screwdriver. Make sure to leave a small gap between each rail to allow for expansion and contraction of the vinyl material.
Once the rails are securely attached, it's time to install the vinyl fence panels. Start at one end of the fence line and slide the panel's tongue into the groove of the previous panel. Make sure the panel is level and plumb before attaching it to the rails. Use screws or brackets to secure the panel to the rails, ensuring a tight fit. Repeat this process for each panel until you reach the end of the fence line.
To maintain vinyl fence panels, regular cleaning is essential. Use a mild detergent mixed with water and a soft brush to remove dirt and stains. Rinse the panels thoroughly with a hose to remove any residue. Avoid using abrasive cleaners or tools that may scratch or damage the vinyl surface.
Inspect the panels regularly for any damage or signs of wear. Replace any broken or cracked panels immediately to maintain the integrity of the fence. Additionally, check the screws or brackets periodically and tighten them if necessary.
Finishing Touches: Gates and Accessories
Now that your vinyl fence panels are securely attached, it's time to focus on the finishing touches with gates and accessories. Gate installation is an essential part of any fence project, as it provides convenient access to your property while maintaining security. When installing a gate, it's crucial to ensure that it aligns perfectly with the rest of the fence, both in terms of height and design. Begin by measuring the opening and selecting a gate that fits perfectly. Attach the gate hinges to the fence post, making sure they are level and properly aligned. Then, attach the gate latch and handle, ensuring they are securely fastened for smooth operation.
In addition to gate installation, adding decorative accents can enhance the overall aesthetic appeal of your vinyl fence. Consider incorporating post caps, which come in various styles and colors, to provide a polished look. These decorative pieces not only add visual interest but also protect the fence posts from water damage. Another option is to install decorative trim along the top or bottom of the fence panels, giving them a more finished and refined appearance.
To further customize your vinyl fence, you can add accessories such as solar lights or address plaques. Solar lights are a practical and eco-friendly option, providing illumination along the fence line without the need for electricity. Address plaques can be personalized with your house number, adding both functionality and a touch of personalization to your fence.


